配置页
2021-7-28 About 25 min
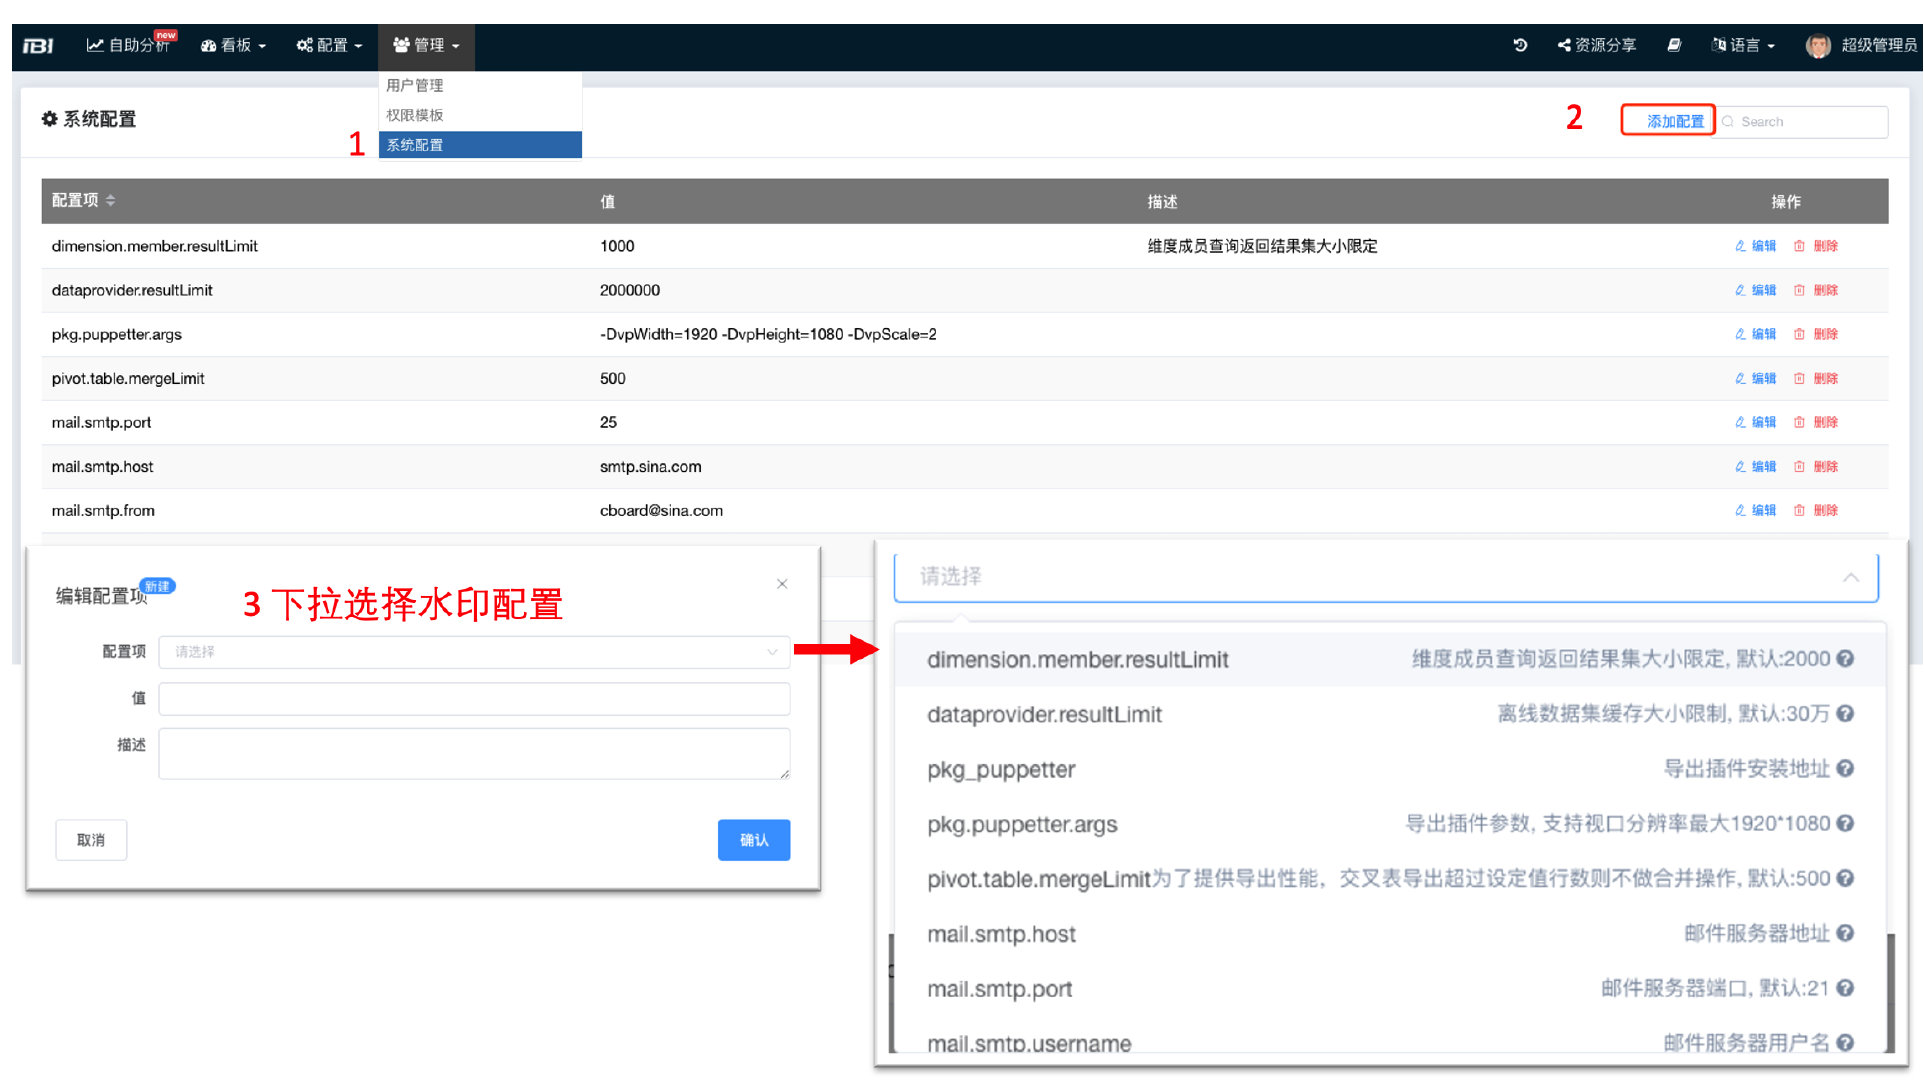
从版本v1.4.0开始,把一些在系统启动时不需要确定的配置信息允许管理员不需要修改配置文件在线配置,并把配置项写入数据库,原本配置文件的配置依旧有效
配置优先级: 默认配置 <
config.properties< Web页面配置(数据库配置)
# 配置文件模块
#
# meta datasource 元数据
# Druid 连接池
#
datasource.meta.name=meta
datasource.meta.driver-class-name=com.mysql.jdbc.Driver
datasource.meta.url=jdbc:mysql://localhost:3306/cboard_dev?characterEncoding=utf-8&serverTimezone=Asia/Shanghai
datasource.meta.username=root
datasource.meta.password=xxx
datasource.meta.max-active=10
datasource.meta.min-idle=0
datasource.meta.initialSize=1
datasource.meta.breakAfterAcquireFailure=true
#
# log datasource 日志数据默认与meta元数据源一致
#
datasource.log.name=log
datasource.log.driver-class-name=${datasource.meta.driver-class-name}
datasource.log.url=${datasource.meta.url}
datasource.log.username=${datasource.meta.username}
datasource.log.password=${datasource.meta.password}
datasource.log.max-active=10
datasource.log.min-idle=0
datasource.log.initialSize=1
datasource.log.breakAfterAcquireFailure=true

# 连接端口与context
server.port=8026
server.servlet.context-path=/cboard
# https相关配置
#server.ssl.key-store=classpath:.xxxx.jks
#server.ssl.key-store-password=xxx
#server.ssl.keyStoreType=JKS

# 对应安装目录下user-files文件夹
file.userfiles-path=user-files
spring.web.resources.static-locations=classpath:/static,classpath:/webui,classpath:/${file.userfiles-path}
spring.web.resources.cache.cachecontrol.cache-public=true
spring.web.resources.cache.cachecontrol.max-age=30d

#
# 系统运行产生文件存储地址
#
runtime.base.filePath=${user.home}/.ibi
# 在线表格写转文件存储地址, 默认目录
dataprovider.onlineTable.filePath=${runtime.base.filePath}/online-tables
# 大屏导出临时文件存储地址
export.cockpit.screenshotPath=${runtime.base.filePath}/screenshot/cockpit

admin_user_id=1

# Service configuratin
#【谨慎配置】维度成员查询返回结果集大小限定, 默认:2000
dimension.member.resultLimit=2000
#【谨慎配置】聚合结果集大小限制,调大会增加服务端压力, 默认:1万
dataprovider.agg.resultLimit=10000
#【谨慎配置】离线数据集缓存大小限制, 默认:30万
dataprovider.resultLimit=300000
# 交叉表是否合并表头阈值=行维数量 * 数据行数
# pivot.table.mergeLimit=500

#
# 离线数据集聚合引擎配置
#
# Inner aggregator type: h2[default], clickhouse
#aggregator.type=clickhouse
# Set batch size load size, times by 1 thousand
aggregator.batchReadSize=50
aggregator.batchLoadSize=50
# 缓存定时任务清理quartz表达式默认每日0点清空所有缓存
# aggregator.cleanJob.quartz=0 0 0 * * ?

# h2 缓存相关配置
# Storage File Syatem
# 1 默认缓存数据存储到文件 Stores data in file system
aggregator.h2.driver-class-name=org.h2.Driver
aggregator.h2.url=jdbc:h2:~/H2Data/cboard;AUTO_SERVER=TRUE;MODE=MYSQL;CASE_INSENSITIVE_IDENTIFIERS=false
# 2 切到缓存数据到内存 Stores data outside of the VM's heap - useful for large memory DBs without incurring GC costs.
#aggregator.h2.url=jdbc:h2:nioMemFS:cboard;AUTO_SERVER=TRUE;MODE=MYSQL;CASE_INSENSITIVE_IDENTIFIERS=false
aggregator.h2.username=sa
aggregator.h2.password=!QAZ2wsx
aggregator.h2.max-active=10
aggregator.h2.testWhileIdle=false

# ClickHouse 缓存相关配置当aggregator.type=clickhouse时生效
aggregator.ck.driver-class-name=ru.yandex.clickhouse.ClickHouseDriver
aggregator.ck.url=jdbc:clickhouse://xxx:8123/ibi
aggregator.ck.username=xxx
aggregator.ck.password=xxx
aggregator.ck.min-idle=1
aggregator.ck.max-active=5
aggregator.ck.testWhileIdle=false


# 看板导出、邮件发送依赖插件
pkg_puppetter=/Users/xxx/cboard/pkg-puppeteer/build/pkg-puppeter-macos
pkg.puppetter.args=-DvpWidth=1920 -DvpHeight=1080 -DvpScale=1
# 导出插件模拟请求地址
frontend.baseurl=http://localhost:8026/cboard

# Max size for export file size by Megabyte ,
# 上传文件大小控制配置,影响单个看板导出最大大小,单个交叉表最大大小,单位兆
# 注:看板大小包含图表截图,交叉表数据,不包含明细表数据
export.maxUploadSize=50
export.maxInMemorySize=4
# export.detailTable.showTitle=true

mail.smtp.host=xxxx
mail.smtp.port=25
mail.smtp.from=cboard@sina.com
mail.smtp.username=xxx@sina.com
mail.smtp.password=xxxx
#mail.smtp.ssl.checkserveridentity=false


# formData.mango.connectionString=mongodb://peter:!QAZ2wsx@tcc2:27017


log.negativeFilter=List
log.positiveFilter=

#
# jwt configurations, support set in web page
#
#jwt.subject=ibi
# expire after hours
#jwt.expire=12
#jwt.secret=xxxx
#jwt.prefix=xxx

session.timeoutMinutes=300


spring.security.auth.type=jdbc

#cas
#caso.client.url=http://localhost:8026
#caso.client.check=${caso.client.url}/login/cas

caso.server.url=https://tcc4:8443/cas
caso.server.login=${caso.server.url}/login
caso.server.logout=${caso.server.url}/logout

#cas RestAPI
caso.server.tgt=${caso.server.url}/v1/tickets
caso.server.validate=${caso.server.url}/serviceValidate

#OAuth2
## implicit
oauth2.implicit.url=http://tcc4:8080/oauth2/oauth/authorize?response_type=token&scope=read
oauth2.userInfo=http://tcc4:8080/oauth2/m/user_info?access_token=
oauth2.client_id=ibi-app
oauth2.client_secret=client_secret
oauth2.redirect_uri=http://localhost:8088/login.html

#LDAP
ldap.url=ldap://www.zflexldap.com:389
ldap.base=dc=zflexsoftware,dc=com
ldap.userDn=cn=ro_admin,ou=sysadmins
ldap.password=zflexpass
ldap.principalPattern=uid=%s,ou=users,ou=guests
# "guest1", "guest1password"

spring.devtools.remote.restart.enabled=false
spring.devtools.livereload.enabled=false
spring.devtools.restart.enabled=false
1
2
3
4
5
6
7
8
9
10
11
12
13
14
15
16
17
18
19
20
21
22
23
24
25
26
27
28
29
30
31
32
33
34
35
36
37
38
39
40
41
42
43
44
45
46
47
48
49
50
51
52
53
54
55
56
57
58
59
60
61
62
63
64
65
66
67
68
69
70
71
72
73
74
75
76
77
78
79
80
81
82
83
84
85
86
87
88
89
90
91
92
93
94
95
96
97
98
99
100
101
102
103
104
105
106
107
108
109
110
111
112
113
114
115
116
117
118
119
120
121
122
123
124
125
126
127
128
129
130
131
132
133
134
135
136
137
138
139
140
141
142
143
144
145
146
147
148
149
150
151
152
153
154
155
156
157
158
159
160
161
162
163
164
165
166
167
# JWT Token生成安全配置
JWT token生成相关配置,支持在配置文件中或者web配置界面修改
提示
从安全层面考虑,用户在部署之后按自己的环境和安全等级要求修改配置
# jwt configurations, support set in web page

# subject可以任意修改
jwt.subject=ibi

# token过期时间(小时)
jwt.expire=12

# 加密秘钥secret可以任意修改
jwt.secret=xxxx

# 令牌前缀prefix可以任意修改
jwt.prefix=xxx
1
2
3
4
5
6
7
8
9
10
11
12
13
2
3
4
5
6
7
8
9
10
11
12
13
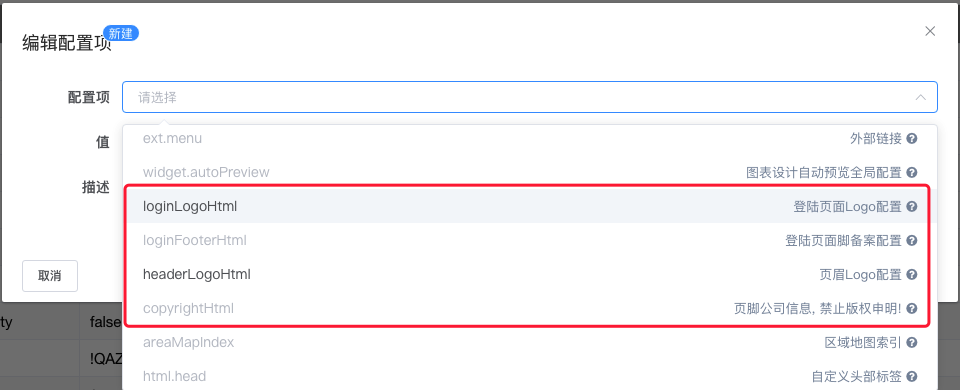
# 页眉/页脚Logo自定义
系统管理员可以在
管理->系统配置页面配置页眉/页脚Logo等
# 说明
为了方便软件服务企业对外提供服务,我们允许客户修改 logo 与脚注相关内容
但是版权声明可以替换为空白,或者单纯的公司信息,但是不允许申明为自己公司版权, IBI所有软件著作权、专利均受法律保护!
如:
允许
xxx 公司 【允许】
禁止
Copyright © xxx 公司 . All rights reserved. 【不允许】
版权 © xxx 公司 . 保留所有版权. 【不允许】
| 配置项 | 格式/语法 | 说明 |
|---|---|---|
| loginLogoHtml | html | 登陆页: Logo配置 |
| loginFooterHtml | html | 登陆页: 备案号配置 |
| headerLogoHtml | html | 左上角: 页眉Logo配置 |
| copyrightHtml | html | 左下角: 页脚公司信息, 禁止版权申明! |
# 配置项 html.head v1.4.3
为什么要使用配置注入,而不是直接修改html源代码?
- 页面缓存: html页面为静态资源,修改之后用户需清理缓存才能生效,配置项注入为动态注入修改刷新页面直接生效
- 多处维护: html页面有多个入口,index.html, render.html, render-lite.html, cockpit.html需要多处修改
- 升级维护: html修改版本更新需要再次维护,注入方式配置信息存储在数据库,更新不受影响
值内容为json数组,额外的需要被注入到当前页面的 HTML <head> 中的标签,每个标签都可以以 [tagName, { attrName: attrValue }, innerHTML?] 的格式指定, 举个例子,增加icon-font自定义css
[
  [
    "link",
    {
      "rel": "stylesheet",
      "href": "//at.alicdn.com/t/font_2677584_cfynubcr16f.css"
    }
  ]
]
1
2
3
4
5
6
7
8
9
2
3
4
5
6
7
8
9
注入成功之后,页面加载会在 <head> 添加下面html
<head>
    <!-- 注入的内容 -->
    <link href="//at.alicdn.com/t/font_2677584_cfynubcr16f.css" rel="stylesheet"></link>
</head>
1
2
3
4
2
3
4
# Iconfont使用
Iconfont (opens new window) 是阿里妈妈 MUX 倾力打造的矢量图标管理、交流平台。
设计师将图标上传到 Iconfont 平台,用户可以自定义下载多种格式的 icon,平台也可将图标转换为字体,便于前端工程师自由调整与调用。
# 使用方式
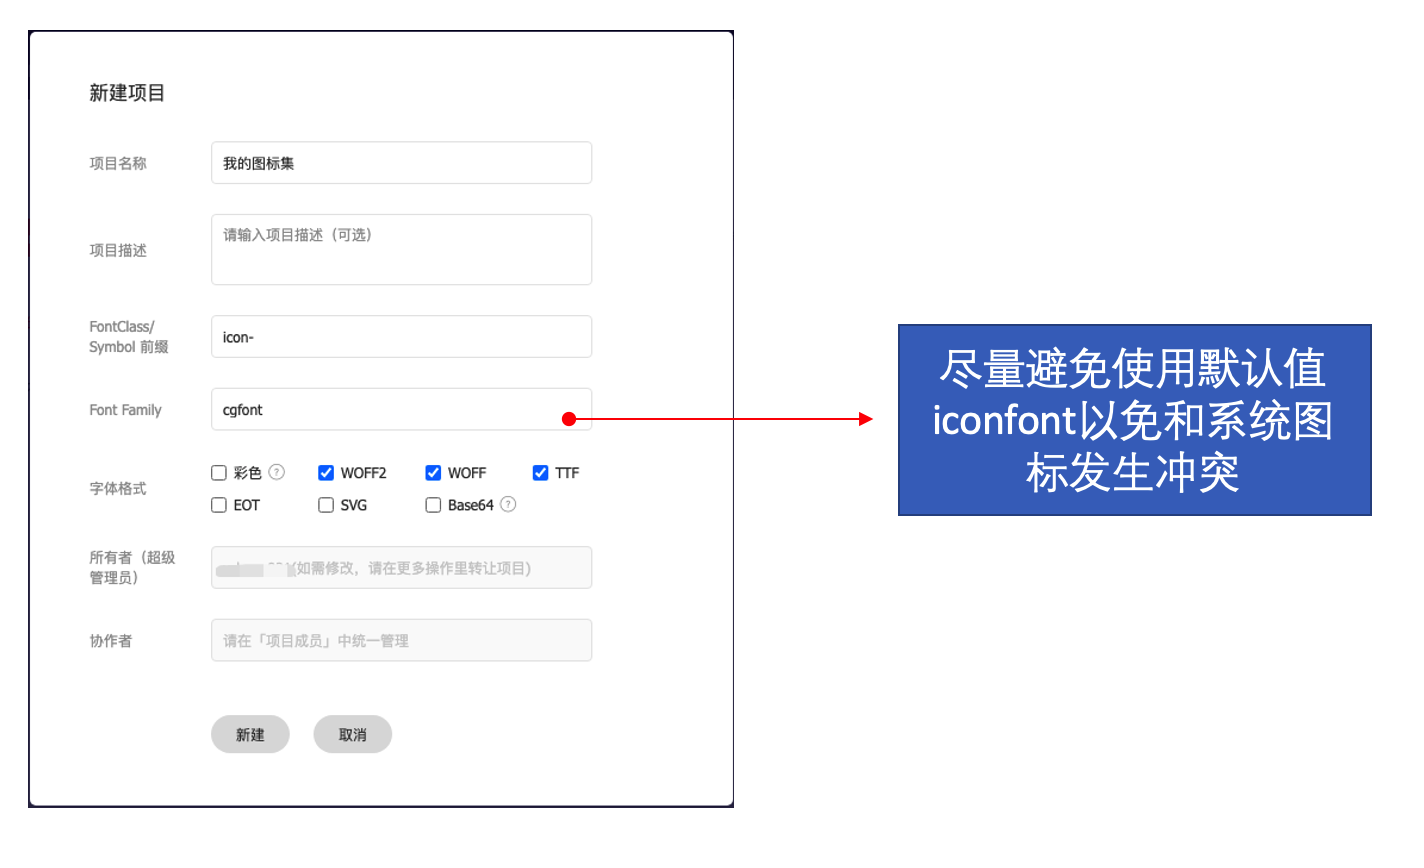
首先你需要新建一个项目,对你网站的图标进行设置与管理:
- 使用 GitHub 或微博登录 Iconfont。
- 在网站上方找到
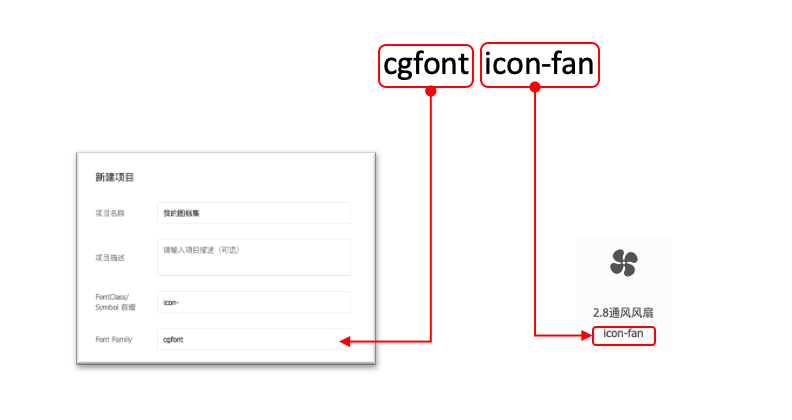
资源管理→我的项目,点击右上角的新建项目图标。 - 设置可以辨识的项目名称
FontClass/Symbol 前缀填入icon-(你也可以根据自己喜好填写,但需要将此值设置到themeConfig.iconPrefix)
提示
Font Family 请保持 尽量避免使用默认值icon佛那个以免和系统图标发生冲突
# 导入图标
- 请自行在 iconfont 自由搜索寻找你想要使用的图标,并点击图标上的 “添加入库” 按钮
- 在寻找完所有图标后,请点击右上角的 “添加入库” 图标,点击下方的 “添加至项目” 并选择你刚刚创建好的项目进行确定。
# 编辑图标
在项目页面,你可以对项目内的图标进行简单的编辑,包括位置、缩放、旋转、颜色以及 Unicode 编号与 Font Class / Symbol 的调整。
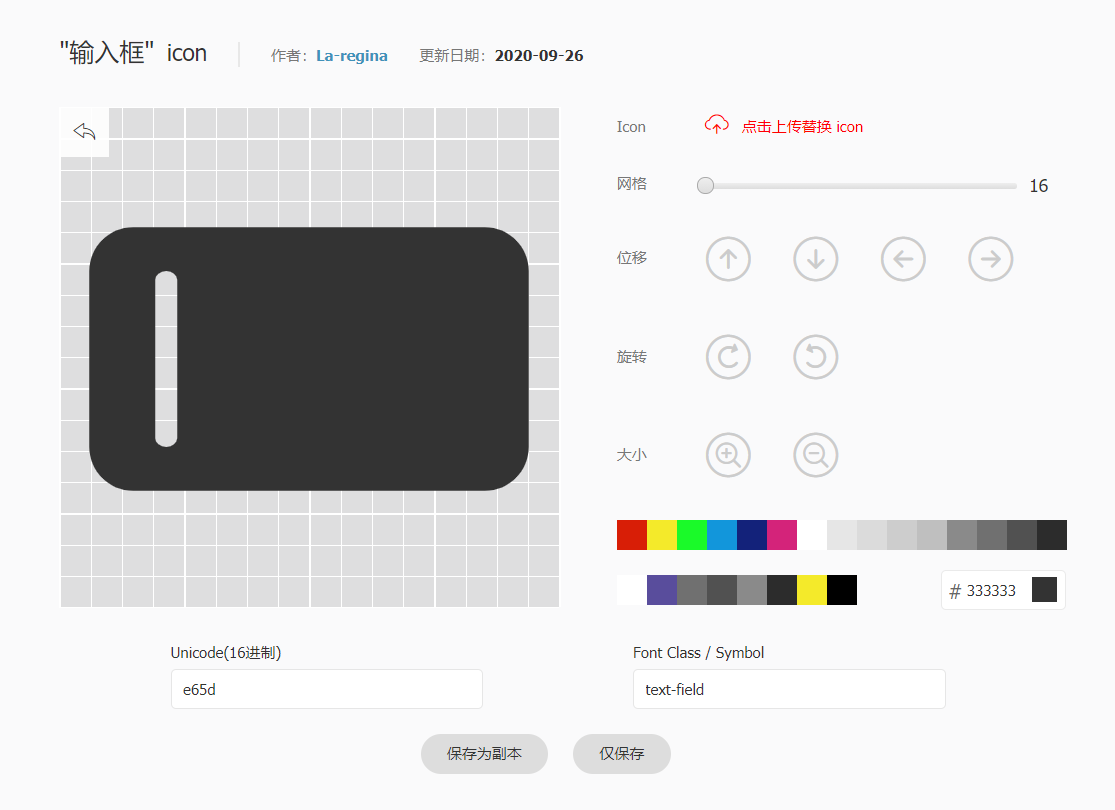
# 生成图标文件
- 请点击项目上方的 “Font Class” 按钮,并点击生成。
# 图标引入IBI
配置项的修改仅支持管理员操作,
管理员登陆,进入系统配置页面,新建配置项html.head,值内容为json数组,增加icon-font自定义css
[
  [
    "link",
    {
      "rel": "stylesheet",
      "href": "//at.alicdn.com/t/font_2677584_cfynubcr16f.css"
    }
  ]
]
1
2
3
4
5
6
7
8
9
2
3
4
5
6
7
8
9
注入成功之后,页面加载会在 <head> 添加下面html
<head>
    <!-- 注入的内容 -->
    <link href="//at.alicdn.com/t/font_2410206_xxxx.css" rel="stylesheet"></link>
</head>
1
2
3
4
2
3
4
Tips
如果您后面添加了新的图标,请重新生成新的 CSS 地址并在 .vuepress/styles/index.styl 中覆盖旧的 CSS 地址。
# 在大屏中使用自定义图标
- 组件列表插入图标
- 点击并激活图标
- 下拉选择图标类型为
user-font,改选项名称后续可能会变更 - 输入图标对应的font class
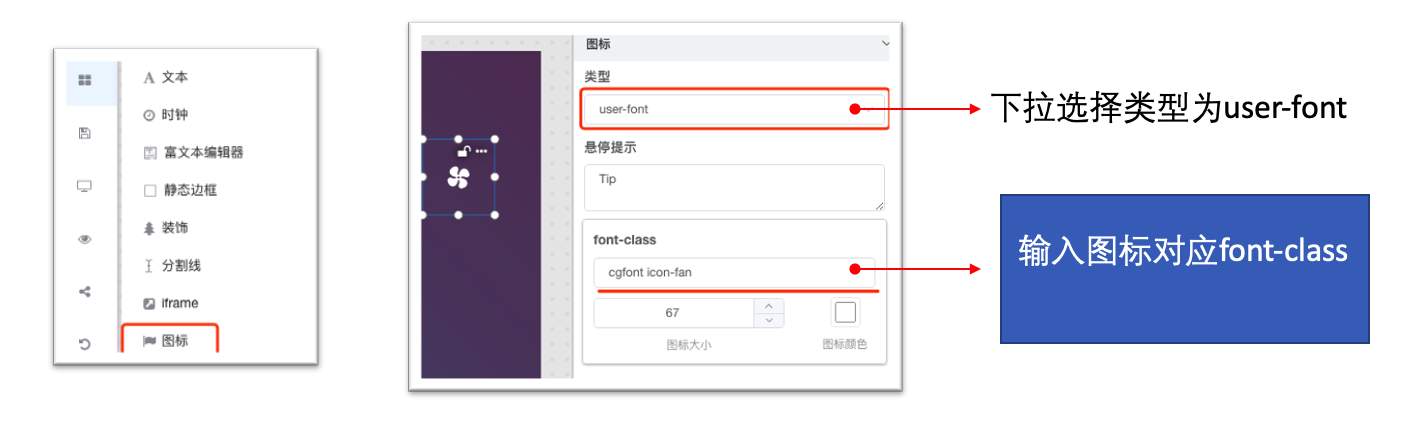
font-class格式解释:
前缀为在使用方式步骤,新建项目输入的Font Fmaily名称,空格之后第二项为改图标在项目中的名称
# 邮件任务发送失败提醒 v1.5.1
从v1.5.1开始可以配置邮件任务管理员邮箱地址mail.job.admin,邮件任务发送失败之后会发送失败通知给邮件管理员,
此外,如果邮件任务所有者如果有配置邮箱地址,相应通知也会发送给改所有者

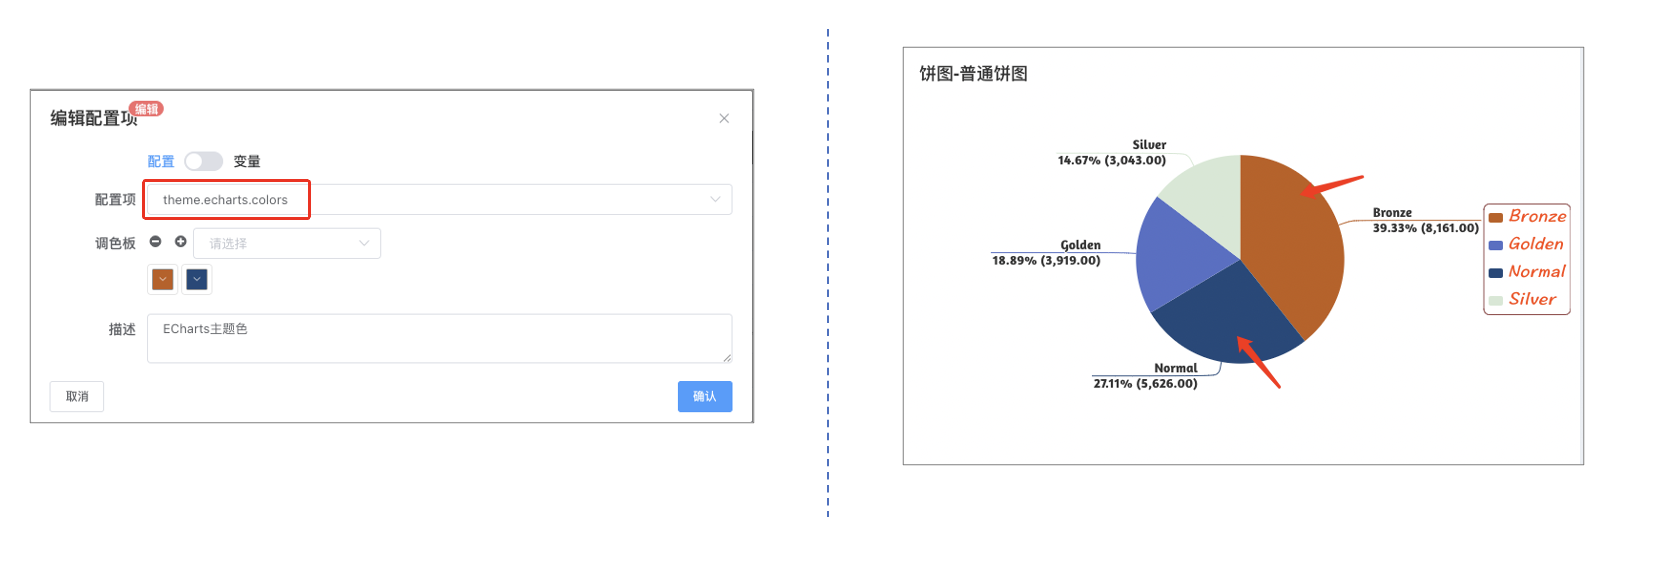
# 全局自定义ECharts主题色v1.9
- 全局自定义ECharts主题色能够让用户配置符合自身企业的配色方案,避免重复繁琐的通过样式配置修改颜色
- 用户可设定任意数量的主题色块,当用户设置系列色不足是会使用系统默认系列色补充
- 系统配置之后需刷新页面生效